One of the most fascinating iPhone photography tips is long exposure photography, which enables you to take distinctive pictures with moving things blurred out to provide a lovely, dreamlike effect. Despite the fact that long exposure photography was previously only possible with SLR cameras, you will learn how to shoot excellent long exposure with an iPhone in this post.
The cameras on smartphones are always changing and getting better. They no longer face as many restrictions when it comes to photography.
Nowadays, a lot of them come with a manual mode that lets you shoot artistic pictures like long exposures.
We’ll walk you through taking long exposure iPhone pictures in this tutorial. When utilizing the cameras on smartphones or iPhones, we’ve also included some helpful hints and recommendations.
What is long exposure with an iPhone??
A shutter is a tiny gate that opens to let light in during the taking of a picture.
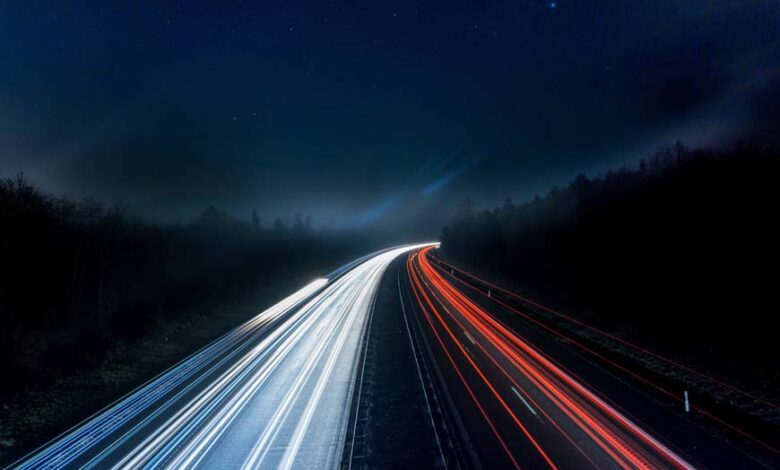
The shutter remains open longer when the shutter speed is sluggish. This implies that light trails will be produced in your photo by moving lights. The trails in your photograph will often get longer the longer the exposure. We call this kind of photography long exposure.
This method may be used to create imaginative and stunning images. There are several situations in which extended exposures are useful. Long exposures may be used in night photography for purposes more than only making light trails. This is so that you may capture more light in your shot, which is beneficial in situations with low light. Long exposures do this.
For example, while taking nighttime landscape photos, you can experiment with a long exposure. You are unable to use artificial illumination to illuminate the sky, particularly in remote locations.
Long exposure photography is another useful technique for photographing heavenly objects like stars and clouds. They will register as light trails and produce spectral components in your camera since they are moving across the sky. Moreover, long exposures work well for catching flowing water features like waterfalls and river streams. The water’s motion seems creamy and smooth when your shutter is opened.
How to Use an iPhone to Take a Long Exposure
To stabilize your iPhone, use a tripod
Using long exposure necessitates a lengthy shutter open period. It will create hazy visuals if you don’t maintain it steady. How do you resolve this issue?
Using a tripod is the best way to capture long exposure shots with an iPhone. You may be sure that your photo will seem sharp because you won’t need to hold your phone. Our favourite iPhone tripods are covered in this post.
A tripod will help you take sharp pictures in areas with little lighting. Smartphones have low light capability and a low ISO. If you use your iPhone camera to take high ISO photos, you will noticeably lose quality in your images.
You may make up for this drawback of utilizing a smartphone camera with the use of a tripod.
You’ll want a tripod mount that allows you to mount your phone on one. It’s a touch tool that attaches to your device. Additionally, it capabilities a bottom thread that can be screwed onto the tripod. Check out our statistics on tripod mounts for iPhones here.
A small tripod may paint better, as it’s far greater transportable for trips. If you need an extra strong and higher setup, you can additionally use a standard iPhone tripod.
Recall that the use of a tripod to connect your phone may not stop the camera shaking on its own. Use a far flung control or a self-timer to make sure you do not unintentionally flow the device whilst capturing.
Use Live Photos with a Long Exposure Effect
Using a popular digital camera for long exposure pictures is probably tough. Try Live Photos first if you’re not but prepared to master all of the technical info of the method.
With the iPhone’s Live Photos feature, you can capture multiple pics and feature them routinely transformed into a touch movie. However, it could also be used to use plenty of pre-set up results, which includes long exposure photos, on your authentic Camera app.
Turn for your iPhone Camera app, then faucet the Live Photos choice on the pinnacle of the display to start the usage of Live Photos. It has a round symbol with rings which are concentric. After deciding on it, you could start taking photos by clicking the red button.
Locate the pictures you shot using Live Photos by going to your gallery. After choosing your favourite picture, swipe up to display Effects. Swipe right to choose Long Exposure. After that, your iPhone gives your photo a “long exposure” look.
You have no influence over the final appearance of your shot because your iPhone adds the effect to your images automatically. However, this is the simplest method for experimenting with long exposure on an iPhone.
Utilize Third-Party Apps on Your iPhone to Take Gorgeous Long Exposures
Using a third-party software is the greatest way to have more control over your iPhone’s long exposure photos.
If you want to produce long exposure on your iPhone, there are several excellent applications available. Procam 7, Slow Shutter Cam, and Camera+ 2 are a few of the better ones that you may utilize.
A few of the pictures in this post were taken with Camera+ 2!.In Camera+2, hit the Presets button in the top centre of the screen, then choose Slow Shutter to enter Slow Shutter Mode. The shutter speed and brightness scales are located at the bottom of the screen once you’re in Slow Shutter Mode.
To adjust the brightness or shutter speed, swipe left or right. You can increase the exposure time by 2 seconds at a time until you are comfortable.
Keep in mind that the light trails will be longer and brighter the longer your shutter speed. Generally speaking, you’ll need at least 6 seconds to obtain good trails.
Test Different ND Filters for Daytime Exposures
Long exposure is usually limited to dim illumination. Taking long exposure photos with an iPhone during the day can frequently result in overexposed photos.
But what if you have to snap pictures outside in the sunlight? Neutral Density (ND) filters are required. Consider these like light-blocking sunglasses for your camera.
The optical density of ND filters vary, influencing the amount of light they allow through. For instance, the optical density of ND2 is 0.3. This corresponds to a decrease of one f-stop. The optical density of ND4 is 0.6, with 2 f-stop decreases, and so on.
To make things straightforward, keep in mind that less light passes through the higher the number.
For cellphones, there are dedicated ND filters with ND2 to ND400 ranges. However, standard ND filters meant for full-size cameras can also be utilized.
They’re designed to accommodate bigger lenses, thus they won’t fit on the camera lens of your phone. However, you can always place them in front of your camera to take pictures.
For most situations, a long exposure photograph taken during the day may be produced with any ND16 to ND64. If the day is gloomy, ND16 should be plenty. However, if you photograph in direct sunshine, you may need to use an ND64 or higher.
Use Light Painting to Express Your Creativity
Another excellent approach for light painting is long exposure. The same idea of holding open the shutter for an extended period of time to capture the movement of lights at night is applied to light painting. The ability to manipulate the light’s movement is the sole distinction.
Put your phone on a tripod and set the shutter for at least 6 seconds to begin light painting. Set the self-timer now, then step in front of the camera.
When the camera turns off, use a flashlight or any other tiny torch or light source to “write” anything in the air. Light trails in the form you sketched in the air will be the result.
Keep in mind that when you paint with light, you are painting a mirror image. Put another way, when you draw something, everything will seem inverted in your camera.
Doodle backwards to ensure you finish up with the right picture and prevent this problem. This holds true even when writing text in the air.
Conclusion
For beginners, learning how to take long exposure photos using a smartphone is a terrific alternative. It will also become easier to use on a conventional camera once you understand how the approach operates.
The creative potential of long exposure photography will astound you, even if you only use your smartphone for photography!


I loved even more than you will get done right here. The picture is nice, and your writing is stylish, but you seem to be rushing through it, and I think you should give it again soon. I’ll probably do that again and again if you protect this walk.
Yes sure. Kepp Visiting. Explore our whole website.