How Can OneDrive Be Disabled on Windows 10? How to disable or remove OneDrive in Windows 10? This post demonstrates how to disable or uninstall OneDrive on Windows 10 and provides a OneDrive substitute.
OneDrive: How to Disable or Remove OneDrive in Windows 10 ?
OneDrive is an online storage platform that gives you access to a certain amount of space if you have a Microsoft account.
In August of 2007, the OneDrive was originally introduced. You may save data and files in the cloud with it. Furthermore, OneDrive enables file sharing and file syncing between Windows, MacOS, and Android or iOS mobile devices.
OneDrive provides customers with a free 5GB storage space. But, you must pay for additional space if you require it.
Features Of OneDrive
OneDrive offers a few strong features as well. As an illustration:
- You can automatically sync photographs with OneDrive. Without human input, OneDrive automatically transfers and stores photos from the device to the cloud. This allows you to access and see images from the Cloud even in the event that the device malfunctions.
- Microsoft has expanded OneDrive’s functionality to include Office Online. This enables you to work with Word, Excel, PowerPoint, and OneNote documents directly in a web browser—uploading, creating, editing, and sharing them. Updated files on the internet are stored instantly to improve data security.
- Sending the link to anyone allows you to share the OneDrive folders and files with them.
Since OneDrive is already included in Windows 10, you don’t need to download and install it. When enabled, it can assist you in syncing files or folders to protect data.
How Can I Turn Off Windows 10 OneDrive?
Even while OneDrive has many uses, there are times when you’ll wish to disable it or uninstall it from your computer.
So, are you aware of how to uninstall or disable OneDrive on Windows 10?
If not, please continue reading; the solutions are provided in the next section. So, we’ll demonstrate for you how to disable OneDrive on Windows 10 using three different ways.
Method 1.
Step 1:
- Open OneDrive and use the Settings to disable OneDrive.
- Click on the OneDrive taskbar icon.
- Use the right-click menu to access OneDrive.
Step2: Turn off OneDrive
- To proceed, select More from the context menu.
- Next, select Settings.
- Please select Settings from the pop-up window and uncheck the box next to “Start OneDrive automatically when I sign into Windows.”
- After that, select Unlink this PC under the Account tab.
- To proceed, click Unlink account.
Following that, a pop-up window requesting your email address will appear. Additionally, you must enter the necessary data and wait for the deactivate procedure to finish. You will eventually log out of OneDrive entirely on your PC. You then terminated Windows 10 OneDrive syncing.
Method 2: Use Group Policy to Turn Off OneDrive
We will now demonstrate the second way to turn off OneDrive. Via group policy, OneDrive sync for Windows 10 can be disabled.
We will now present the comprehensive tutorials to you.
- First, activate the group policy.
- Combining the Windows and R keys will launch the Run dialog.
- To proceed, type gpedit.msc in the window and choose OK.
Step2: Turn off OneDrive
- Use the path below to open the OneDrive folder in the Local Group Policy Editor window: Computer Configuration > Windows Components > Administrative Templates > OneDrive
- Next, choose the option Stop using OneDrive to store files, and give it a double-click.
- Select Enabled from the pop-up box, then click Apply and OK to save the changes.
You can restart your computer after all the processes have been completed. Following that, you can see that OneDrive is still accessible through the File Explorer but isn’t right now.
Additionally, you may set the Prevent the usage of OneDrive for file storage to Not Configured if you wish to allow OneDrive once more.
Method 3: Use the Registry Editor to disable OneDrive
We will now demonstrate the third way to disable OneDrive on Windows 10. You may disable OneDrive Windows 10 by using the Registry editor.
Although the registry editor is a very strong tool, tinkering with it may be dangerous since altering entries and values could render your machine unusable. Therefore, you should make a registry backup before continuing. Therefore, you may give MiniTool ShadowMaker, a competent Windows backup program, a try.
You may disable OneDrive Windows 10 after backing up the registry editor or the PC.
Step 1: Launch Registry Editor
- Combining the Windows and R keys will launch the Run dialog.
- To proceed, type regedit into the box and choose OK.
Step2: Turn off OneDrive
- Locate the following key in the Registry Editor window:
- To proceed, right-click on the Windows key and select New > Key.
- Give OneDrive as the new key’s name.
- Click and hold the OneDrive icon while selecting the right white area.
- Next, select New > DWORD(32-bit) Value to proceed.
- Give DisableFileSyncNGSC as the new key’s name.
- Next, double-click the newly created key to set the Value Data to 1.
You can exit the Registry Editor window and restart your computer after completing all the instructions. Your computer’s OneDrive will then be turned off.
How Can OneDrive for Windows 10 Be Removed or Uninstalled?
In actuality, you may use the items below to uninstall or delete OneDrive Windows 10.
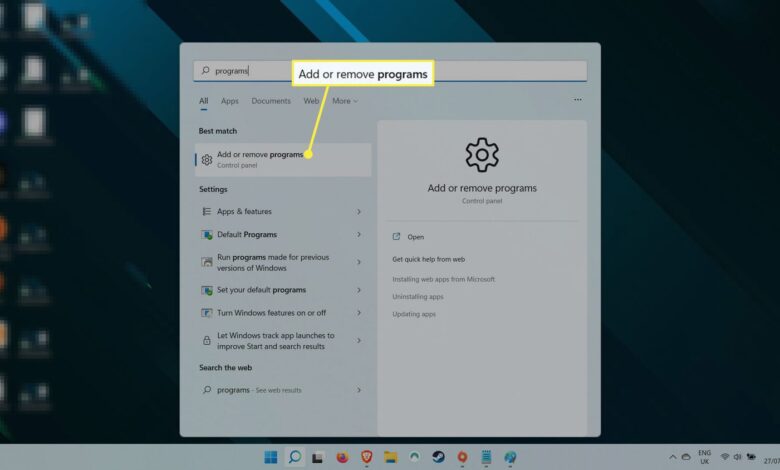
Step 1: access the control panel.
- Enter the Control Panel into Windows’ search bar.
- Select the most appropriate option to proceed.
Step 2: Get Rid of OneDrive
1. To proceed, click Uninstall a software under software in the popup window.- After that, you’ll get a list of all the apps on your computer. To uninstall
- Microsoft OneDrive, select it and select Uninstall from the context menu.
You have now successfully uninstalled or deleted OneDrive from your computer after completing the aforementioned steps.
OneDrive substitute in Windows 10
This section will demonstrate an essential workaround for OneDrive in Windows 10/8/7 that you may use after removing OneDrive. This alternative to OneDrive may backup the operating system to keep the machine secure in addition to syncing data.
MiniTool ShadowMaker is an alternative to OneDrive on Windows 10/8/7. This file sync program helps you to safeguard your data by allowing you to synchronize files or folders to two or more places. Furthermore, MiniTool ShadowMaker is a backup program that can backup directories, drives, partitions, files, and even the operating system. Therefore, in addition to file synchronization, you have the option of creating an image if you wish to protect data.
We will now demonstrate how to utilize MiniTool ShadowMaker to sync files in order to protect sensitive data.
- First, open MiniTool ShadowMaker.
- Install MiniTool ShadowMaker after downloading it.
- Start it.
- Select “Keep Trail.”
Step 2: Choose the source of synchronization.
- Please navigate to the Sync page after accessing the main interface.
- Select the synchronization source by clicking the SOURCE module, then click OK.
Step 3: Select the intended disk
To proceed, select the DESTINATION module.
Select the disk that you want to save the synchronized files on. These are the five pathways to be picked as destinations. Selecting an external hard disk is advised.
Press OK.
Step 4: Begin file syncing
Once the source and destination for the synchronization have been chosen, click Sync Now to begin the process right away.
To postpone the task, you may also select Sync Later. However, you must relaunch it from the Manage page.
You have successfully synced files to a different place after all stages are completed. As you can see, you can make a system picture using MiniTool ShadowMaker.
In summary
In conclusion, this article has explained what OneDrive is and provided three ways for you to disable it. Furthermore, this article explains how to delete or remove OneDrive for Windows 10.